Installation d'une carte DVB-s2 sur un serveur UBUNTU 12.04 LTS
> wget http://www.tevii.com/tevii_ds3000.tar.gz
> tar xfvz tevii_ds3000.tar.gz
> cp dvb-fe-ds3000.fw /lib/firmware
Source : http://www.linuxtv.org/wiki/index.php/TeVii_S464
Affichage des articles dont le libellé est installation. Afficher tous les articles
Affichage des articles dont le libellé est installation. Afficher tous les articles
dimanche 13 avril 2014

mardi 29 octobre 2013
Ubuntu Server - Install et configuration de Bacula - Sauvegarde de son SI
Install de webacula :
Avoir un serveur php mysql opérationel (Voir tuto précédent)
sudo apt-get install zend-framework
sudo nano /etc/sudoers
ajouter :
# Allow Apache to use bconsole binary
www-data ALL=NOPASSWD: /usr/bin/bconsole
sudo -s
mkdir /var/www/webacula
wget http://sourceforge.net/projects/webacula/files/latest/download?source=files
mv download\?source\=files webacula-5.5.tar.gz
tar -xvzf webacula-5.5.tar.gz
sudo nano /var/www/webacula/application/config.ini
[general]
;; supported adapters : PDO_MYSQL, PDO_PGSQL, PDO_SQLITE
db.adapter = PDO_MYSQL
db.config.host = localhost
db.config.username = root
db.config.password = VOTRE_MOT_DE_PASSE_BDD_BACULA
db.config.dbname = bacula

;; see http://www.php.net/timezones
; def.timezone = "UTC"
def.timezone = "Europe/Paris"

;; if locale undefined, webacula use autodetect
;; avaliable locales : en, cs, de, fr, pt_BR, ru, it, es
; locale = "fr"
Ensuite on modifie le fichier suivant :
sudo nano /var/www/webacula/install/db.conf
# See also application/config.ini

# bacula settings
db_name="bacula"
# for Sqlite only
db_name_sqlite="/var/bacula/working/bacula.db"
db_user="root"

# CHANGE_THIS
db_pwd="VOTRE_MOT_DE_PASSE_MYSQL_ROOT"

# Webacula web interface settings
#
# Built-in superuser login is 'root'
#
# CHANGE_THIS
webacula_root_pwd="VOTRE_MOT_DE_PASSE_ACCES_WEB"
Ensuite on créer la base de donnée mysql :
cd /var/www/webacula/install/MySql
# ./10_make_tables.sh
Creation of webacula MySQL tables succeeded.
# ./20_acl_make_tables.sh
Creation of Webacula ACLs MySQL tables succeeded.
On créer le fichier pour apache :
cp /var/www/webacula/install/apache/webacula.conf /etc/apache2.site-available
ensuite on modifie le fichier avec nos infos :
 #
# Webacula - Web interface of a Bacula backup system
# Apache conf
#
# Allows only localhost by default
#

LoadModule rewrite_module modules/mod_rewrite.so

# AccessFileName .htaccess
# RewriteLog "/var/log/httpd/mod_rewrite.log"
# RewriteLogLevel 3

# SetEnv APPLICATION_ENV development
SetEnv APPLICATION_ENV production

Alias /webacula  /var/www/webacula/webacula
<Directory /var/www/webacula/webacula/html>
   RewriteEngine On

   RewriteBase   /webacula
   RewriteCond %{REQUEST_FILENAME} -s [OR]
   RewriteCond %{REQUEST_FILENAME} -l [OR]
   RewriteCond %{REQUEST_FILENAME} -d
   RewriteRule ^.*$ - [NC,L]
   RewriteRule ^.*$ index.php [NC,L]

   php_flag magic_quotes_gpc off
   php_flag register_globals off

   Options Indexes FollowSymLinks
   AllowOverride All
   Order deny,allow

   Deny from all
   Allow from 127.0.0.1
   Allow from localhost
   Allow from 192.168.17.251
   Allow from ::1
   #
   # change the settings below
   #
   # Allow from <your network>
</Directory>


<Directory /var/www/webacula/webacula/docs>
   Order deny,allow
   Deny from all
</Directory>

<Directory /var/www/webacula/webacula/application>
   Order deny,allow
   Deny from all
</Directory>

<Directory /var/www/webacula/webacula/languages>
   Order deny,allow
   Deny from all
</Directory>

<Directory /var/www/webacula/webacula/library>
   Order deny,allow
   Deny from all
</Directory>

<Directory /var/www/webacula/webacula/install>
   Order deny,allow
   Deny from all
</Directory>
<Directory /usr/share/webacula/tests>
   Order deny,allow
   Deny from all
</Directory>

<Directory /var/www/webacula/webacula/data>
   Order deny,allow
   Deny from all
</Directory>
#
# test mod_rewrite
#
<Directory /usr/share/webacula/html/test_mod_rewrite>
   RewriteEngine On
   # for test mod_rewrite
   RewriteBase   /webacula/test_mod_rewrite
   RewriteRule ^testlink([^/]*).html$  index.php?testlink=$1 [L]

   php_flag magic_quotes_gpc off
   php_flag register_globals off

   Options Indexes FollowSymLinks
   AllowOverride All
   Order deny,allow

   Deny from all
   Allow from 127.0.0.1
   Allow from localhost
   Allow from ::1
   #
   # change the settings below
   #
   # Allow from <your network>
</Directory>
on charge dans apache le fichier :
sudo a2enmod rewrite
sudo a2ensite webacula
sudo ln -s /usr/share/php/libzend-framework-php/Zend/ /var/www/webacula/library/Zendsudo chown www-data:www-data -R /var/www/webacula
http://localhost/webacula
:)
Install de bacula-web :
sudo mkdir /var/www/bacula-webcd /var/www/bacula-web
sudo wget http://www.bacula-web.org/files/downloads/bacula-web-5.2.13-1.tar.gz
sudo tar -xvzf bacula-web-5.2.13-1.tar.gz
sudo chmod -R 777 view/cache
sudo cp application/config/config.php.sample application/config/config.php
sudo nano application/config/config.php
[Ajouter ces informations de base de données]
modifier le vhost apache :
sudo nano /etc/apache2/sites-available/default
$ajouter
<Directory /var/www/bacula-web>
AllowOverride All
</Directory>
entre les <virtualHost>
et redemmarer apache :
sudo service apache2 restart
et ce connecter à l’interface bacula :
http://ip/bacula-web/test.php
WebOgraphie :
Téléchargement :
http://sourceforge.net/projects/webacula/files/webacula/5.5.0/
http://wiki.nekolover.net/plateformes/backup/bacula/webacula
http://www.java-tutorial.ch/ubuntu/webacula-installation-on-ubuntu
Si erreur bavcula = 12
http://sourceforge.net/p/webacula/support-requests/18/
si impossible de ce connecter avec l'user par defaut :
http://sourceforge.net/mailarchive/forum.php?thread_name=4F0ADDCA.3050405%40revpol.com&forum_name=webacula-users
http://www.java-tutorial.ch/ubuntu/webacula-installation-on-ubuntu
http://webcache.googleusercontent.com/search?q=cache:ZH6pB9H_CBUJ:https://www.digitalocean.com/community/articles/installing-and-configuring-bacula-on-an-ubuntu-12-04-vps+&cd=2&hl=fr&ct=clnk&gl=fr&client=ubuntu
http://webmodelling.com/webbits/miscellaneous/bacula.aspx
http://doc.ubuntu-fr.org/bacula
jeudi 14 mars 2013
SquidAnalyzer - Installation sur une Ubuntu 12.04
Bonjour,
Site Web : http://squidanalyzer.darold.net/
Téléchargement : http://sourceforge.net/projects/squid-report/
je recherchais comment afficher des logs sur mon serveur Proxy, et j'ai bien sur utilisé lightsquid, mais l'interface est trés moche, mais il remplis bien ça fonction.
j'ai quand même trouvé une alternative plutôt pas mal, qui utilise une bien meilleur interface.
Voici une procédure pour installer SquidAnalyzer pour une interface utilisateur plus agréable
Quelque capture d'écran :


ça change de lightsquid :)
Voici comment l'installer sur une "fraiche" installation d'Ubuntu 12.04 :
Prérequis :
- Ubuntu 12.04 à jour
- Squid installé avec des logs dispo
- Avoir un serveur Apache et php fonctionnelle
Étape 1 : ce mettre en root :
$> sudo -s
Étape 2 : Installation des prérequis
root$>perl -MCPAN -e 'install GD::Graph::bars3d'
Étape 3 :
Récupération de l'archive et décompression du programme :
root$>cd /var/www
root$>wget http://downloads.sourceforge.net/project/squid-report/squid-report/5.1/squidanalyzer-5.1.tar.gz?r=http%3A%2F%2Fsourceforge.net%2Fprojects%2Fsquid-report%2F%3Fsource%3Ddlp&ts=1363292235&use_mirror=heanet
root$>mv squidanalyzer-5.1.tar.gz?r=http:%2F%2Fsourceforge.net%2Fprojects%2Fsquid-report%2F?source=dlp squidanalyzer-5.1.tar.gz
root$>tar -xzf squidanalyzer-5.1.tar.gz
root$>mv squidanalyzer-5.1 squidanalyzer
Étape 4 : Installation de l'application
root$>cd /var/www/squidanalyzer
root$> make
root$> make install
Suivre les instructions afficher.
Étape 5 : Préparation de la conf Apache :
root$>nano /etc/apache2/sites-available/default
et ajouter entre le balise <virtualhost></virtualhost>
Alias /squidreport /var/www/squidanalyzer
<Directory /var/www/squidanalyzer>
Options -Indexes FollowSymLinks MultiViews
# AllowOverride None
# Order deny,allow
# Deny from all
# Allow from 127.0.0.1
</Directory>
et redémarrer apache :
root$> service apache2 restart
Étape 6 : Récupérer ses première Stats
Lancer le programme de parssage de log Squid :
root$>/usr/local/bin/squid-analyzer -c /var/www/squidanalyzer/etc/squidanalyzer.conf -l /var/log/squid3/access.log
Étape 7 :
Ce connecter à l’interface web de son serveur :
http://192.168.0.18/squidreport/

Étape 8 : Prépation du cron :
root $> crontab -e
et ajouter la ligne suivante :
0 2 * * * /usr/local/bin/squid-analyzer -c /var/www/squidanalyzer/etc/squidanalyzer.conf -l /var/log/squid3/access.log > /dev/null 2>&1
@ suivre ...
Site Web : http://squidanalyzer.darold.net/
Téléchargement : http://sourceforge.net/projects/squid-report/
je recherchais comment afficher des logs sur mon serveur Proxy, et j'ai bien sur utilisé lightsquid, mais l'interface est trés moche, mais il remplis bien ça fonction.
j'ai quand même trouvé une alternative plutôt pas mal, qui utilise une bien meilleur interface.
Voici une procédure pour installer SquidAnalyzer pour une interface utilisateur plus agréable
Quelque capture d'écran :


ça change de lightsquid :)
Voici comment l'installer sur une "fraiche" installation d'Ubuntu 12.04 :
Prérequis :
- Ubuntu 12.04 à jour
- Squid installé avec des logs dispo
- Avoir un serveur Apache et php fonctionnelle
Étape 1 : ce mettre en root :
$> sudo -s
Étape 2 : Installation des prérequis
root$>perl -MCPAN -e 'install GD::Graph::bars3d'
Étape 3 :
Récupération de l'archive et décompression du programme :
root$>cd /var/www
root$>wget http://downloads.sourceforge.net/project/squid-report/squid-report/5.1/squidanalyzer-5.1.tar.gz?r=http%3A%2F%2Fsourceforge.net%2Fprojects%2Fsquid-report%2F%3Fsource%3Ddlp&ts=1363292235&use_mirror=heanet
root$>mv squidanalyzer-5.1.tar.gz?r=http:%2F%2Fsourceforge.net%2Fprojects%2Fsquid-report%2F?source=dlp squidanalyzer-5.1.tar.gz
root$>tar -xzf squidanalyzer-5.1.tar.gz
root$>mv squidanalyzer-5.1 squidanalyzer
Étape 4 : Installation de l'application
root$>cd /var/www/squidanalyzer
root$> make
root$> make install
Suivre les instructions afficher.
Étape 5 : Préparation de la conf Apache :
root$>nano /etc/apache2/sites-available/default
et ajouter entre le balise <virtualhost></virtualhost>
Alias /squidreport /var/www/squidanalyzer
<Directory /var/www/squidanalyzer>
Options -Indexes FollowSymLinks MultiViews
# AllowOverride None
# Order deny,allow
# Deny from all
# Allow from 127.0.0.1
</Directory>
et redémarrer apache :
root$> service apache2 restart
Étape 6 : Récupérer ses première Stats
Lancer le programme de parssage de log Squid :
root$>/usr/local/bin/squid-analyzer -c /var/www/squidanalyzer/etc/squidanalyzer.conf -l /var/log/squid3/access.log
Étape 7 :
Ce connecter à l’interface web de son serveur :
http://192.168.0.18/squidreport/
Étape 8 : Prépation du cron :
root $> crontab -e
et ajouter la ligne suivante :
0 2 * * * /usr/local/bin/squid-analyzer -c /var/www/squidanalyzer/etc/squidanalyzer.conf -l /var/log/squid3/access.log > /dev/null 2>&1
@ suivre ...
jeudi 28 février 2013
Vmware ESX 5.1 - Licence Et utilisation Gratuite !
Bonjour,
voici la marche à suivre pour avoir vmware esx 5.1 (la dernière version à l'heure actuel) gratuitement !
Il y a des restrictions mais y a de quoi en profiter quand même :
Pour ajouter ça licence dans VMWARE, il faut avoir installer le vsphere client, puis aller sur son hôte :
onglet configuration dans le menu Logiciel -> Fonction autorisées
ensuite on clique sur modifier en haut à droite :

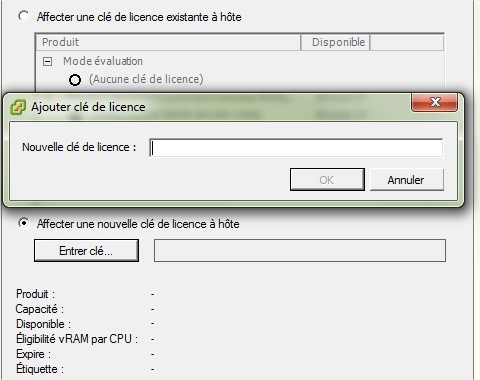
il suffit entrer la clé et de valider :

A vous les joies de la virtualisation !!!
voici la marche à suivre pour avoir vmware esx 5.1 (la dernière version à l'heure actuel) gratuitement !
Il y a des restrictions mais y a de quoi en profiter quand même :
Pré-requis:- Votre système hôte doit avoir 32go de ram physique au maximum- Assurez-vous que tout le matériel est compatible avec Esxi via la matrice de compatibilité disponible ici: http://www.vmware.com/resources/compatibility/search.php- Téléchargez l'hyperviseur Esxi 5.1 directement sur le site de Vmware.Information importante :Cette licence ne donne pas accès au support Vmware ou logiciel Dell.Il est obligatoire d'avoir un compte Vmware et de demander un clé pour Esxi (lien direct: https://www.vmware.com/go/get-free-esxi/ )- Cette licence comprend donc uniquement l’hyperviseur en lui-même. Donc pas de vCenter / vMotion / etc etc. Seulement vClient pour administrer votre host.- Cette licence donne seulement droit à 32 GB de ram supporté par l’hôte.Si votre matériel a plus de 32go de ram, l'hyperviseur ne démarrera pas.
Pour ajouter ça licence dans VMWARE, il faut avoir installer le vsphere client, puis aller sur son hôte :
onglet configuration dans le menu Logiciel -> Fonction autorisées
ensuite on clique sur modifier en haut à droite :

il suffit entrer la clé et de valider :
A vous les joies de la virtualisation !!!
Inscription à :
Articles (Atom)